Do you hate having students use whiteboards? But you like the idea of them? You like the idea of not having to make copies, for a doing a quick check on the spot but you get a headache when you even think of getting them out?
I used to be there my friend. You spend the whole time saying “So-and-So, quit drawing!” over and over again. So, you try the “2 minutes of free draw” before the teaching time… then you still have to say “So-and-So, quit drawing!” followed by “I already gave you 2 minutes to draw.”
What you need is a routine. A known, structured routine. And trust me- it works! Now, will there still be the occasional sneaky free-draw student… yes. I can’t magically wave that away. Wish I could. But what I can give you is help on how to make a routine that shares your routine and gives students the expectation of behavior when using the whiteboards.
Here are a few tips and pointers on how to use whiteboards in the classroom. Download my whiteboard routine posters at the end of the post!
(stick with me till the end of the post for your FREE download!)
Before You Start Using Whiteboards
Set the stage- how do you want students to get their materials ready? You can do the free draw way (and no judgement here!). Make it important thing to have the materials set and ready to go. I use the phrase “get set” to set the tone of the whiteboard time. Once students get to the carpet, I say “get set”. I like to have the expectation that students come to the carpet and sit cross-legged, with the whiteboard, marker and eraser on the floor in front of them, and hands in lap. Of course, make a big deal about those who are following directions for the first few students who do it first. The others will quickly follow suit. Teacher magic!
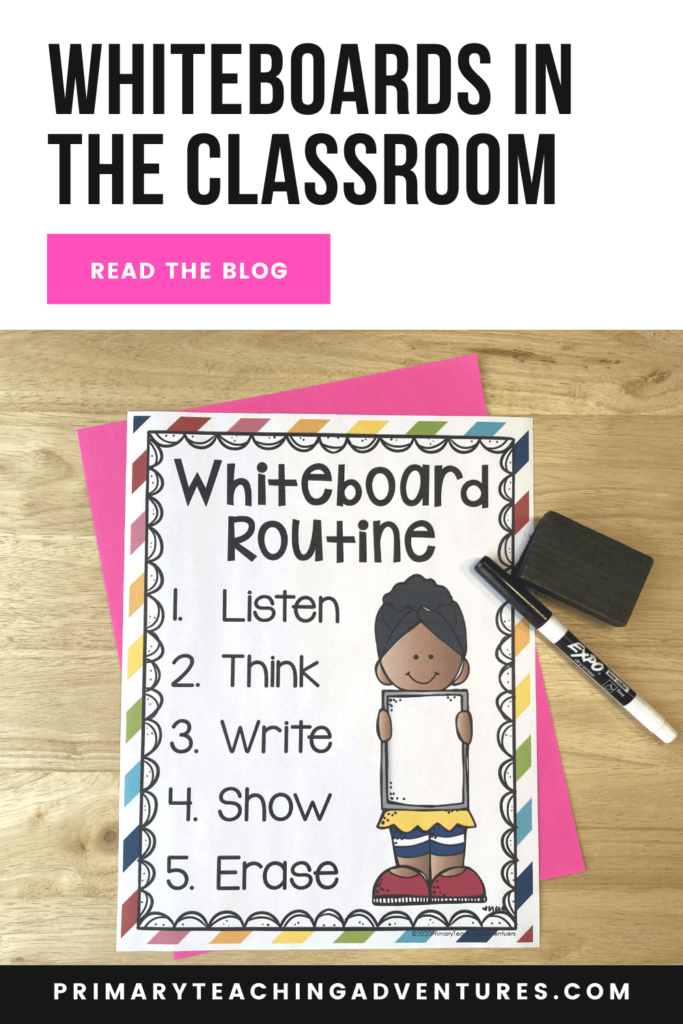
The Whiteboards Routine
When you introduce this routine, don’t have the materials. Talk about the expectations first, then practice with the whiteboards. Explain to students that whiteboards can be tools to help us practice different skills (i.e. math skills).
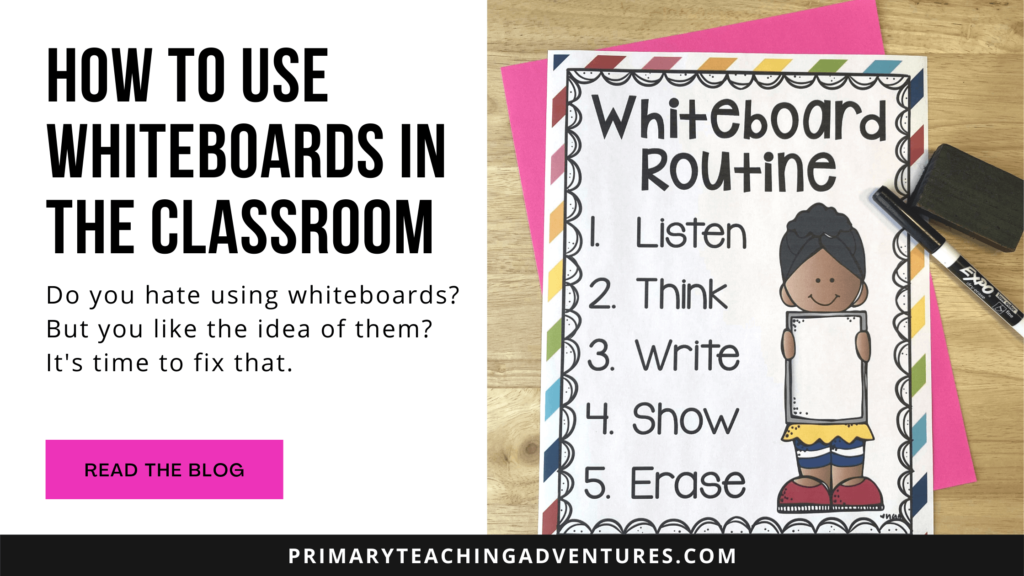
I also include hand motions for each step so students can have a visual and a physical representation of the expectations. Write on the board or display these free posters to show each step. Say each step with the hand motions and explain what to do during each step.
Review by only saying the key phrase with the hand motions. Then, have the students repeat with you and do the hand motions. Repeat. And repeat. And repeat.
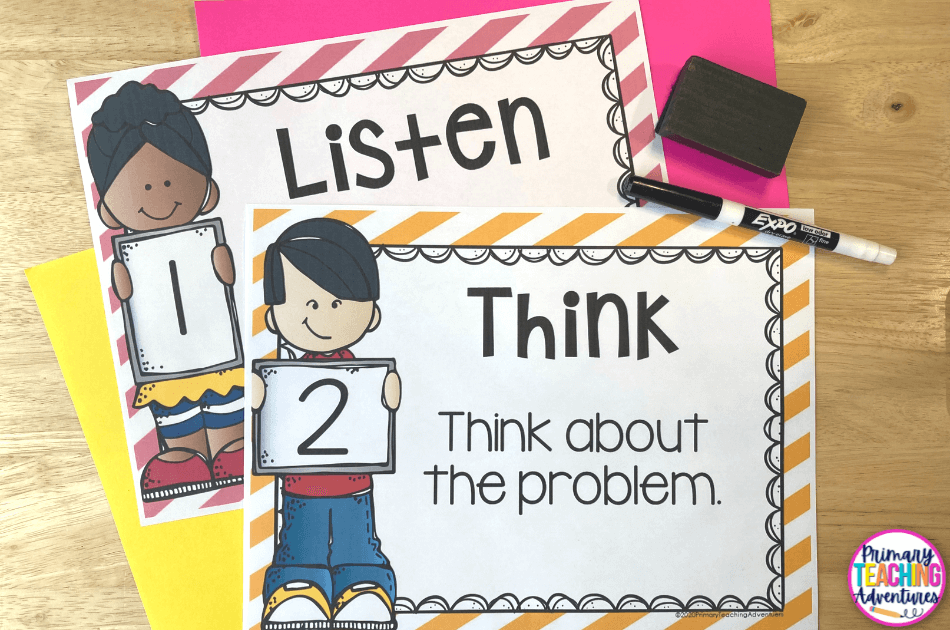
1. Listen
Hand Motion: Cup your hand behind your ear.
Teach students that they must listen to the directions. They will need their listening ear to know what to write.
2. Think
Hand Motion: Point to your brain.
Teach students to think in their brain about the answer. Remind them of any strategies you’ve been learning about.
3. Write
Hand Motion: Pretend write on your hand. I have my palm flat and the other hand draws a straight line across.
Teach students to write their answer in the middle of the whiteboard, large enough that the teacher can see it.
4. Show
Hand Motion: Use two hands to hold up an invisible board.
Teach students to turn around the whiteboard, and using two hands hold it in front of them or above their heads. Wait until all students have their boards showing. You may also add a subpart here: Share. If you want all the students to say their answer at the same time, you could put in place that when you say “Class, share your answer” they can all say their answer.
5. Erase
Hand Motion: Flat palm “wipes” the other palm.
Teach students to erase their boards (with permission, of course!) and wait. You can even have them show you their clean board or have them “get set” again from the next problem by putting their materials on the floor and hands in lap.
I go through these steps EVERY TIME we use our whiteboards. The first few weeks of school, we say the routine and with the hand motions before getting the materials. As students gain control and rhythm with the expectations, we can just get started right away without having to review. I continue say each step during the process and doing the hand motions.
Example of What You Can Say
“Are you ready? Listen, what number comes after 45? Think about counting by ones. What comes next after 45? Write the number. Show me your board. [insert feedback like “I see that So-and-So has an answer. I see that most of the boards are up. I see we are almost ready.”] Class, what is the answer? 45! Great! Erase your answer.”
At the End of the Whiteboards Routine
If you want to reward students with free draw at the end, then go for it. It works to keep some student’s focus attention during the routine if they know they will be rewarded with the free draw time. I end the routine by saying “Return your materials.” Students put away their materials and return to their seat/desk/carpet spot.
As with any routine YOU must stick to it. Keep it tight and routine so that students don’t get bored and start that free drawing (by now you might think I’m anti-free draw- it’s not true! It’s just the thorn of the whiteboard that really makes it not effective for instructional use, that’s all). If you keep it tight, whiteboard practice can be a quick and effective instructional routine to practice and review skills.
Click to download the Whiteboard Routine Posters for free!